Purple Rain Cake
Rating
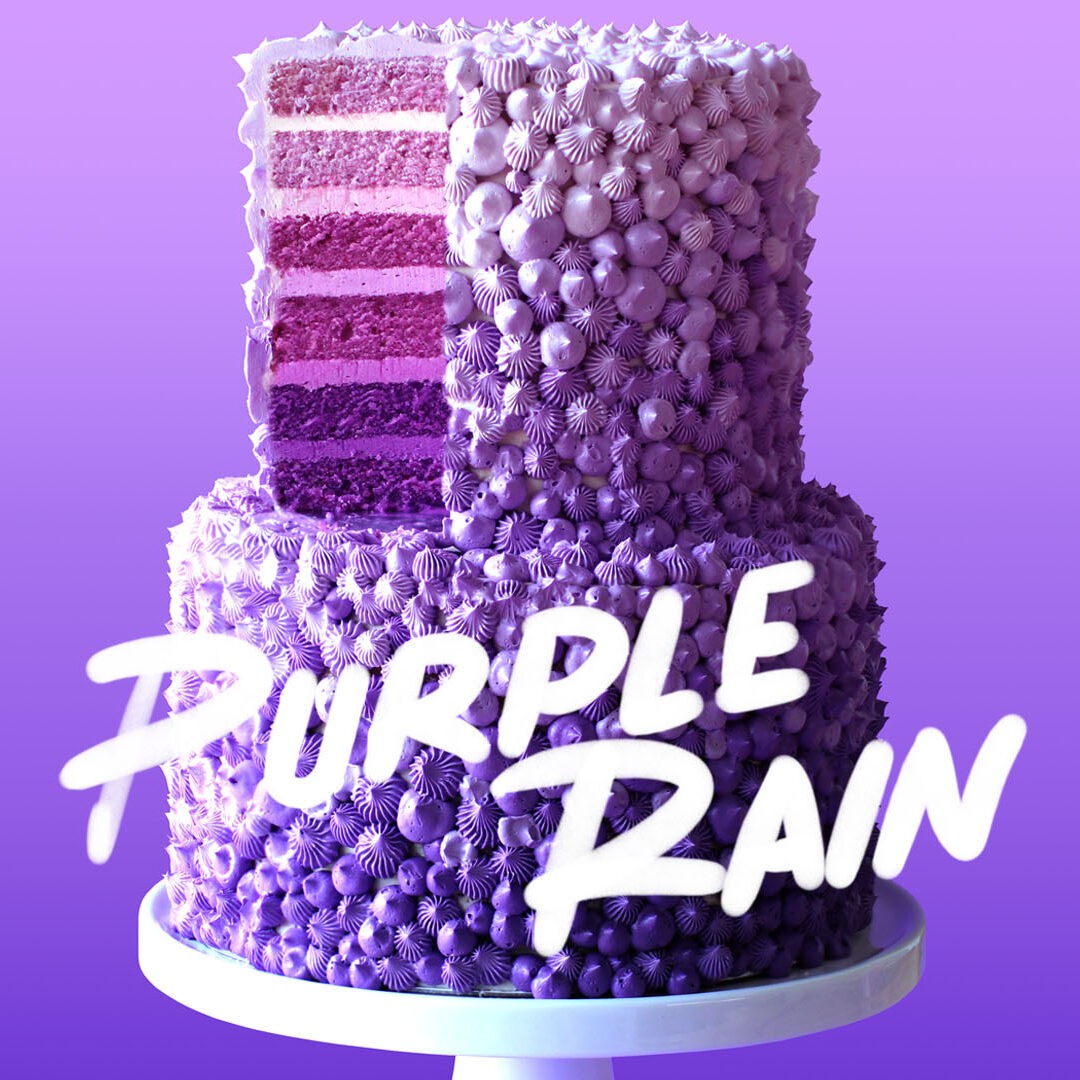
This cake tastes so good, it makes dove's cry.
Ingredients
- Cake
- You’ll need to triple this recipe
- 429g all-purpose flour
- 265g caster (superfine) sugar
- ½ tsp salt
- 3 tsp baking powder
- 375ml of milk
- 125ml vegetable oil
- 125g unsalted butter, softened
- 2 tbsp Greek yogurt (can substitute with sour cream)
- 1 tsp vanilla extract
- 2 large eggs
- Cake extras
- Regal purple food gel
- Deep pink food gel
- 3 tsp blackberry essence
- Frosting
- X3 batches Swiss meringue buttercream frosting (recipe on thescranline.com)
- Regal purple food gel
- Deep pink food gel
- 2 tsp blackberry essence
Instructions
- Cake
- Before you begin
- You’ll need to triple this cake recipe. Not the cake extras, just the cake recipe itself. Nobody has a bowl big enough to handle all that batter so it’s just easier to make in 3 batches. I’d recommend making all the batter and then split it amongst the different cake tins.
- Preheat a fan-forced oven to 160C (320F) or 180C (356F) for a conventional oven. Spray three 8” cake tins with oil spray and line the bottom with baking paper. You’ll also need three 6” cake tins for the top tier. If you only have one of each sized tin you can just bake them in the oven one at a time it will just take longer. I’d recommend baking the cake the day before it’s being served to allow yourself plenty of time to make the entire cake and to allow it to cool down properly before frosting.
- Let’s begin!
- Making the batter
- In the bowl of a stand mixer fitted with the paddle attachment, add the flour, baking powder, caster sugar and salt. Turn mixer on low speed and allow it to mix for a couple minutes to help everything combine well (alternatively you may do this by sifting the ingredients together). Add the softened butter and mix until it resembles a fine sand like texture.
- Add the milk, oil, Greek yogurt, blackberry essence, eggs and vanilla extract into the bowl with the dry ingredients and mix on medium speed until no dry ingredients are visible. Scrape down the bowl and mix for another 20 seconds.
- Colouring the batter
- Once you’ve made triple the recipe split into 3 bowls evenly. To colour the batter use the following formulas:
- DARK PURPLE LAYER: 6 drops purple food gel + 3 drops pink food gel. Gently fold until well combined.
- MIDDLE PURPLE LAYER: 4 drops purple food gel + 2 drops pink food gel. Gently fold until well combined.
- LIGHT PURPLE LAYER: 2 drops purple food gel + 2 drops pink food gel. Gently fold until well combined.
- Filling the cake tins
- So you’re going to have fill three 8” cake tins with batter and three 6” cake tins with batter. For each colour you want to add about ⅔ of the batter into the 8” cake tin and ⅓ of the batter into the 6” cake tin.
- Bake the 8” cake tins for 45 min and the 6” cake tins for 30 min or until a toothpick inserted comes out clean. Allow the tins to cool for 2 min and then carefully flip the cake tins over on to a cooling rack to cool completely before using. I’d recommend chilling them overnight.
- Using a large serrated knife, carefully trim the top off each layer of cake to make even and flat layers. Try to aim to get them all the same height. An easy way to do this is to find the lowest height of the cake, place a skewer or toothpick next to that point and mark it. As you go around each side of the cake cutting it, use the marked skewer to make sure each cut is at the same height. I used a cake leveller in the video which is the simplest way to do it.
- Frosting
- So you’re going to colour the frosting in 5 different shades. Those shades will be used to fill the cakes but also to frost the outside of the cakes. But you’ll just use white frosting for the crumb coat. So set about ⅙ of the white frosting aside before you colour it. Split the rest of the frosting into 5 bowls. These are the colour formulas starting with the lightest:
- / 10 drops purple food gel + 5 drops pink food gel + a couple drops of black berry essence
- / 7 drops purple food gel + 4 drops pink food gel + a couple drops of black berry essence
- / 4 drops purple food gel + 3 drops pink food gel + a couple drops of black berry essence
- / 2 drops purple food gel + 2 drops pink food gel + a couple drops of black berry essence
- / 1 drops purple food gel + 1 drops pink food gel + a couple drops of black berry essence
- If you feel like you want darker shades add more purple food gel.
- Crumb Coat
- Let’s start by assembling the 8” cake. You’re going to start by adding a dab of the dark frosting on the board.
- Add the first dark cake layer on top of that and gently but firmly press down to make it stick to the frosting on the cake board. Add a layer of the darkest frosting on top and level off with an offset spatula. Then add the second layer of the darkest cake. Add the next lightest layer of frosting. You’re going to work your way up to the lightest cake layers and frosting.
- Add some white frosting around the outside of the cake. Use a small offset spatula to spread the frosting around making sure to fill in any cracks that may be showing in between each layer. Then use a cake scraper to level off the sides and top. It doesn’t have to be perfect! Just make sure everything looks neat and even.
- You’re going to repeat this for the 6” cake too.
- Chill them both for at least 3 hours.
- Assembling the cake!
- To assemble the cake, add three bubble straws into the chilled 8” cake. This is going to ensure your cake doesn’t collapse when it thaws before serving. The best way to make sure the bubble straws are even in height and don’t peak out the top is to add one straw all the way in. Lift it slightly and then marks it. Put it flush next to the other 2 straws and cut. Insert them into the cake in a triangle shape toward the middle so they support the 6” cake. Add a dab of frosting on top of the 8” cake and then carefully place the 6” cake on top. I’ve found the easiest way to do this is using a large offset spatula. Take your time it’s not a race!
- Ok so to finish off the cake you’re going to add the rest of your 5 different shades into two separate piping bags each. One bag will be fitted with a Wilton #32 piping tip and the other with a small round tip about the same size as the #32. And from here folks it’s about patience. You’re going to be piping blobs of frosting starting at the bottom of the cake with the dark purple and working your way up to the top using the lightest shade of purple.
This cake tastes so good, it makes doves cry.Full Recipe: taste.md/2Dy0wxL🎥: The Scran Line
Julkaissut Sweeten Torstaina 25. tammikuuta 2018